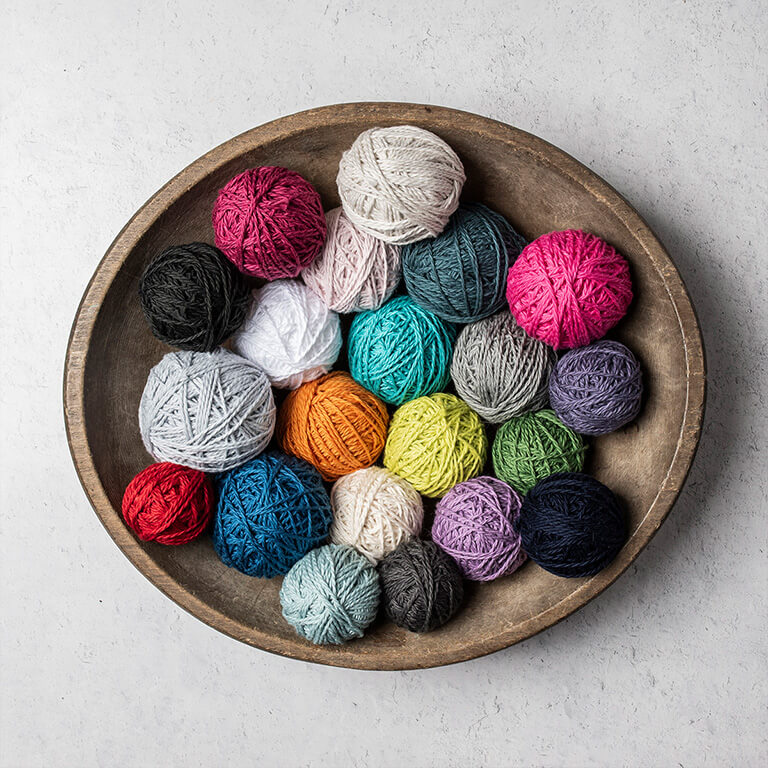
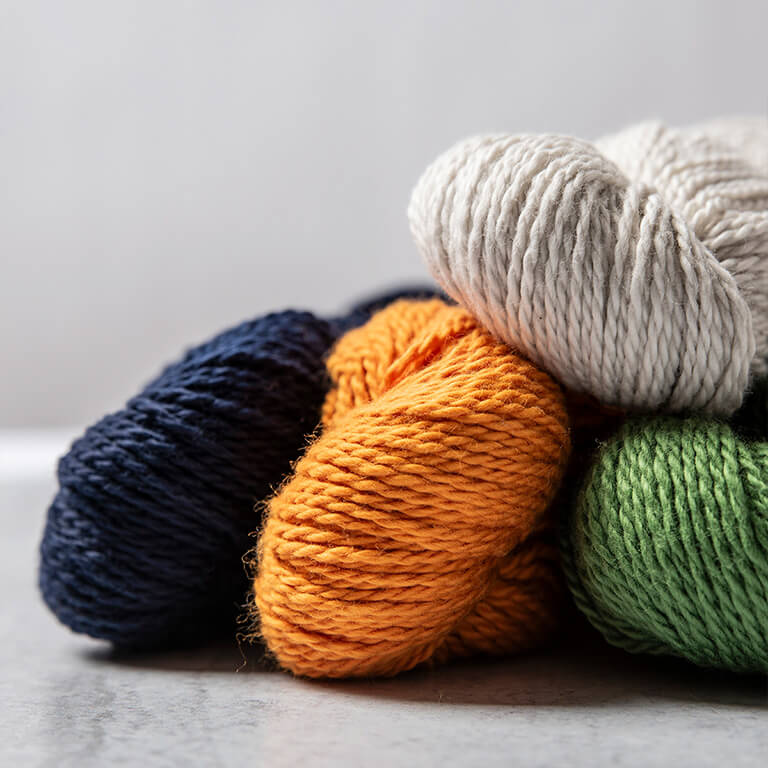
Spud says (the blog)

Archive for August 2010

August 22, 2010

Part 1: Easy Top-Down Raglan Knitalong

Part 1: Easy Top-Down Raglan Knitalong

Welcome! This is a knitalong to create your own custom fit raglan pullover sweater! I will be posting the recipe in parts as we work up our sweaters. At the end I will post this knitalong version of the recipe as one of the free patterns on the sidebar. You can join in any time. Please join me on the Friends of Spud & Chloë Ravelry group to post photos, chat and share our progress.

Click here for the forum thread!

Click here for the Easy Top-Down Raglan Ravelry Project Page!

You can also leave comments here on the blog, of course.

To get started today we are taking your back neck measurement and doing some simple math to determine the number of stitches to cast on. That will cover steps 1-6 out of 10 steps total. Steps 1-6 are not difficult (just take them one by one) but I have to say after these initial steps the rest of the sweater is incredibly simple.

Size: Made to fit you!

Yarn: Spud & Chloë Sweater (55% superwash wool, 45% organic cotton; 100 grams/160 yards)

Bust measurement in inches – number of skeins of Spud & Chloë Sweater:
32 inches – 5 skeins
34 inches – 5 skeins
36 inches – 6 skeins (This is the sample size that fits me perfectly!)
38 inches – 6 skeins
40 inches – 6 skeins
42 inches – 6 skeins
44 inches – 7 skeins
46 inches – 8 skeins
48 inches – 8 skeins
50 inches – 8 skeins
52 inches – 8 skeins
54 inches – 9 skeins

Needles: US size 7 circular needles, 24-inch and a set of 4 double-pointed needles OR the correct size to obtain gauge

Gauge: 5 stitches per inch in stockinette stitch
Materials:
Tape measure
Scissors
Yarn needle
Stitch Markers
Abbreviations:
k  knit
p  purl
k2tog knit 2 stitches together
ssk slip 2 stitches separately as if to knit, knit the 2 slipped stitches together through the back of the loop
sm slip marker
kfb knit in the front and back of a stitch
pm  place marker
Let’s Get Started!
Note: I will refer to the Grape Jelly Raglan as an example and TC’s Raglan throughout the knitalong. The Grape Jelly Raglan is the finished sample I made to fit me (36-inch bust) and TC’s Raglan is the sweater I am making with the knitalong. TC is an average size 11-year-old.
Important note: All of this basic information to make this raglan pullover sweater can be found in Wendy Bernard’s book, Custom Knits, on pp. 154-155.

Step 1: The first measurement you need to take to determine the number of stitches you are going to cast on is the back of your neck. Do not include your shoulders in this measurement.
Grape Jelly Raglan: My back of neck actual measurement: 5 inches
TC’s Raglan: TC’s back of neck actual measurement: 4 inches
Measuring TCs back of neck

Measuring TC's back of neck

I measured TC’s neck for this step but I just measured my own back of neck for the Grape Jelly raglan. You don’t need someone else to take this measurement.
Now, you can vary this measurement depending on how big or wide you would like your sweater neck opening to be. The other thing to remember is that we are adding a garter stitch edging to the neck opening and that needs to be taken into consideration. For my sample I added 1 extra inch to my back of neck measurement to start. Wendy says that the average woman’s back of neck measurement is between 5 and 6 inches.
For example:
Grape Jelly Raglan: Starting measurement: 5 + 1 (extra inch added for edging) = 6 inches
TC’s Raglan: Starting measurement: 4 + 1 (extra inch added for edging) = 5 inches
Step 2:
Multiply the number of inches for the starting measurement by the stitch gauge per inch which is 5.
For example:
Grape Jelly Raglan: 6 x 5 = 30
TC’s Raglan: 5 x 5 = 25 (rounded up to 26)
*Wendy suggests that if you end up with an odd number that you should round up to an even number.
This is the number of back stitches.
Step 3:
We are going to figure out how many stitches we need for the tops of the sleeves.
Take the back stitches number from step 2 and divide it by 3.
For example:
Grape Jelly Raglan: 30 divided by 3 = 10
TC’s Raglan: 26 divided by 3 = 8.6 or 8 (I am rounding down to keep this number even)
This number is the sleeve top number. You will have 2 sleeve tops.
Now we have the back stitches number and the sleeve top number.
For example:
Grape Jelly Raglan: back stitches = 30; sleeve top stitches = 10
TC’s Raglan: back stitches = 26; sleeve top stitches = 8
Step 4:
To find out the number of stitches to cast on you will use the back stitches number and the sleeve top number for both sleeves. You will add 1 stitch to each end for each front.
For example:
Grape Jelly Raglan: 1 (front) + 10 (sleeve top) + 30 (back) +10 (sleeve top) + 1 (front) = 52 stitches (number to cast on)
1+10+30+10+1 = 52 stitches
TC’s Raglan: 1 (front) + 8 (sleeve top) + 26 (back) + 8 (sleeve top) + 1 (front) = 44 stitches (number to cast on)
1+8+26+8+1 = 44 stitches
Using your circular needle cast on as follows:
1 st, pm, sleeve top number, pm, back number, pm, sleeve top number, pm, 1 st
For example:
Grape Jelly Raglan cast on: 1, pm, 10, pm, 30, pm, 10, pm, 1
TC’s Raglan cast on: 1, pm, 8, pm, 26, pm, 8, pm, 1
Step 5:
You will be increasing using a kfb (knit into the front and back of the stitch) on each stitch before and after each of the 4 stitch markers.
Work the first 2 rows as follows:
Row 1 (right side row): kfb, sm, kfb, knit to 1 stitch before the next marker, kfb, sm, kfb, knit to 1 stitch before the next marker, kfb, sm, kfb, knit to 1 stitch before the next marker, kfb, sm, kfb
Row 2 (wrong side row): purl
Step 6:
You will continue repeating rows 1 and 2 in Step 5 AND at the same time begin increasing for the neckline by using a kfb in the first and last stitch of every right side row. Every right side row will increase 10 stitches as follows:
Next and every right side row: kfb, (knit to 1 stitch before the first marker, kfb, sm, kfb) repeat 4 times total, knit to the last stitch, kfb (increase 10 stitches)
Next and every wrong side row: purl
Continue working right side rows by kfb in the first and last stitch and increasing with a kfb in each stitch on both sides of the stitch markers (10 stitches increased) and purling the wrong side rows until the garment measures to the bottom of your throat. Wendy recommends that this length will be between 2 or 3 inches.
For example:
Grape Jelly Raglan: worked to measure 3 inches
TC’s Raglan: to be determined (I will share as I go!)
I am heading off to cast on for TC’s cardigan!
Yay! I am so excited to get this going. I will be back soon with some words of wisdom to add from Wendy. She is going to make a boatneck sweater (thus she will have a wider starting measurement) out of Sweater in the Chipmunk colorway right along with us. As soon as I hear from Wendy I will pass on her words of wisdom to you.
August 18, 2010

Surprise Guest Revealed!

Hi Spud & Chloë Friends,

I am starting with a quick side note before I dig into today’s topic. Please pop over, if interested, to see a few video interviews I did on Yarn on the House. I talk a lot about Spud & Chloë and the best part is that there is a huge Spud & Chloë giveaway running through Sunday, Aug. 22! The prize is enormous!  Click here to watch and enter!

Okay, today’s the day! Do you see who that is up there in that tiny thumbnail? Our special guest contributor to the Easy Top-Down Raglan Knitalong is none other than the fabulous sweater designer/author Wendy Bernard! I am so excited to get to tell you this. I am sure you all know who Wendy Bernard is but just in case I will tell you a little about her. Wendy is an accomplished top-down sweater designer who has designed many of today’s most popular sweater patterns. If you look at the top 100 sweater patterns on Ravelry her designs pop up over and over again. In fact, right now she is filming a new DVD on top-down sweaters in Denver at the Interweave headquarters. I can’t wait for that one.

I feel so good about having her by our sides as we work. Wendy has written a completely awesome book which I am sure many of you are familiar with called Custom Knits. Now, let me tell you how this all came to be….

This summer I have knitted four (and a half) adult size sweaters for myself. All of them have been top-down and are varied slightly in styles and stitches. I have also been reading lots of patterns and formulas and recipes for top-down sweaters. I’ve had the book Custom Knits for a long time but haven’t had time to knit myself sweaters for literally years. I have had about 7 sweaters from this book ear-marked as must knit sweaters for some time now! I love everything about Custom Knits especially all of the technique and teaching aspects included in the book. Wendy is a great instructional writer as well as a talented designer.

I turned to the back-end material of the book to find formulas or as I like to call them recipes for a variety of top-down sweaters and cardigans and sleeve types. I kept thinking about how I wanted to do a knitalong on Spud says! so I had my eye out for a simple, no-nonsense recipe. On page 154 in Custom Knits I found the simplest 10 step formula for a top-down raglan sweater I have ever seen. I fell in love with the 10-steps to the perfectly and personally fitted sweater. I grabbed my tape measure, a ball of Grape Jelly and my size 7 circular needles and dug in. I had so much fun making my own sweater using Wendy’s formula.

Here’s where it gets good. I emailed Wendy to see if she minded if I used her basic formula for the top-down raglan as our general recipe for this knitalong. Not only did she say yes, she said she could help out as well. I couldn’t believe my good luck and your good luck. She really and truly is THE expert on this area of knitting in my opinion. She knows the pitfalls, the easy way out of trouble, how to solve fit issues, what looks best and where, techniques, tips and tricks, etc. The list goes on and on.

Wendy is currently working on her second book of top-down sweaters where she delves even deeper into the subject. I highly recommend Custom Knits (click here to see all of the projects in the book), Wendy’s first book, for anyone wanting to knit top-down sweaters.  You may want to get a copy of your own especially after we knit this sweater together. You will want to branch right out and try another sweater immediately.

Here is the link to Knit and Tonic, Wendy’s ultra-fantastic blog. It has been one of my favorites for years now.

Here is the link to Wendy’s book Custom Knits.

Here is the link to Wendy’s ravelry designer page.

Go and enjoy her talent, her humorous and fun blog and her spectacular photography! Wendy is a gem.

One last thing, I am joining right in the knitalong with you to knit another sweater. I am gathering my stray balls of Sweater to make The Collector a sweater of her own. She loves mine so much that she wants one for herself. I will take photos along the way including the measuring and figuring out as I create her own “custom knits” top-down raglan.

Isn’t this great? I have heard from so many people gathering their skeins of Sweater in almost every color available, Cider, Firecracker, Watermelon, Toast, Moonlight, Grass, Pollen, Firefly, Chipmunk…. Will there be a Turtle, an Ice Cream,  and a Rootbeer? We’ll have to wait and see! I know that a few stores are trying to get yarn for customers. I know a few stores that have been inundated with orders, too. We will move slowly at the beginning so everyone can get settled so don’t worry about it. The information will always be available and you can join in at any time, even after it is over!

This is all so exciting!

August 16, 2010

Top-Down Raglan? Check!

Hi Spud & Chloë Friends,

Finally! I finished the top-down raglan yesterday. Last week got so hectic that I didn’t quite get it done and I was so close. As I bound off the second sleeve, my daughter (The Collector or TC) was sitting right next to me. I wove in a few ends as she watched. As soon as I snipped off the final end she promptly snatched the sweater and threw it on. It looks so good on her even if it is a little big.

I told her now that she had it on she had to let me take a few photos. That’s the price you pay.

I can’t begin to describe the squish and warmth of the Grape Jelly Sweater yarn. I made my sweater roomy because I live in a cold climate and I will wear layers underneath. In the fall I will wear this to soccer games as a jacket. Can’t wait to throw it on and run out the door. Although it is so soft I wouldn’t need to wear layers at all.

TC has her own fairy garden in the back corner of our yard. She tends to it daily although some of her plant selection didn’t fare well in the shady spot. Live and learn.

Here’s the scoop. I am running a very casual knitalong so you can all make your own Easy Top-Down Raglan with me. You can join in at any time, no worries. When we finish as a group I will gather all of the information and put it up here on Spud says! as a free pattern so you can start any time even after we are done.

The difference for this knitalong is that we are using a formula or recipe to make our sweater. That means I will be giving you simple, easy to follow guidelines to make a sweater that will fit you! You will have to use your calculator and your tape measure along the way. I promise it is not difficult. One of the greatest benefits to making this type of sweater is that you can try it on as you go. Trying the sweater on tells you how long to make the body and sleeves, where to stop on your armhole increases and when to join the body, how long to make the neck scoop, etc.

I will be writing out exactly how I made my version of the sweater with all specifics on how I made it to fit me. If you are about my size you can make the same sweater I made but I want you to make a sweater that is perfect for your body.

I kept it simple and straightforward. I believe you can’t get any simpler than a stockinette stitch body and arms with a garter stitch edging on a top-down raglan.

Lookin’ good!

The Easy Top-Down Raglan Knitalong will officially start next week, Monday, August 23rd. This week I want you to gather your materials and to make a swatch to check your gauge. The wound skein above is the Grape Jelly that is the left over 6th skein that I just broke into. I didn’t use much of it.

Here is the yarn requirement for Spud & Chloë Sweater in skeins and bust measurement in inches.

Bust measurement in inches – number of skeins of S&C Sweater:
32 inches – 5 skeins
34 inches – 5 skeins
36 inches – 6 skeins (This is the sample size that fits me perfectly!)
38 inches – 6 skeins
40 inches – 6 skeins
42 inches – 6 skeins
44 inches – 7 skeins
46 inches – 8 skeins
48 inches – 8 skeins
50 inches – 8 skeins
52 inches – 8 skeins
54 inches – 9 skeins

There you have it! I worked up my sweater in US size 7 needles using 24-inch circulars and a set of 4 double-pointed needles. The gauge is at 5 stitches per inch. Please make a swatch to make sure you are getting the correct gauge.

Other things you’ll need:

Tape measure

Yarn needle

Scissors

That should do it! I’ll be back soon to announce who our special guest sweater expert is. I am so excited she is joining us for this project. You won’t be disappointed, I promise.

August 12, 2010

Flamingo – Free Pattern!

Hi Spud & Chloë Friends,

Okay, I’ve got a cute one for you today. I’ve been putting out some sneak peeks on Twitter and Facebook yesterday (please join me on both – see the top of the blog sidebar for links). The response was huge! I didn’t know everyone needed a Flamingo but now I do. What a fun and fast knit. The Hi-Bounce Pinky Ball inside the body makes for a great shape and a great bounce. My daughter could not stop with the bouncing flamingo yesterday. You can bounce this one standing up and it will bounce high enough that you can catch it.

Here is some information you might like to know:


Finished Measurements:

3 inches wide (including the wings) by 5 inches tall (with the head curved over)

Yarn:

Spud & Chloë Sweater (55% superwash wool, 45 % organic cotton; 160 yards/100 grams), 1 skein each in Watermelon #7512, Ice Cream #7500 and Popsicle #7501

Blue Sky Alpacas Worsted Cotton (100% organically grown cotton; 150 yards/100 grams), 1 skein in Ink #613

Tools:

US size 5 double pointed needles, set of 4 or size to obtain gauge

Yarn needle

Scissors

Tape measure or ruler

Polyester fiber-fill

Pinky Hi-Bounce Ball  (optional if you prefer to stuff the body with fiberfill)

Black embroidery floss

Stitch marker

2 pipe cleaners

Gauge:

6 stitches per inch in stockinette stitch


The wings and tail use a simple picot edging bind off. I have a video tutorial available on how to do this technique if you are interested.

Click here for the video tutorial!

The legs and tail help to balance the body so it can sit up nicely. Play around with the placement of these pieces so your Flamingo can sit up on its own.

The reason the Hi-Bounce Pinky has an optional after it on the pattern is because you could also just stuff the flamingo with fiberfill if you don’t want the ball inside. That works fine, too. The Hi-Bounce Pinky Balls can be found at many local toy shops but they are also available for online order on Amazon.

Click here for the Hi-Bounce Pinky Ball link to Amazon!

Click here for the downloadable pdf pattern for Flamingo

Click here for the Ravelry page for Flamingo!

Have fun with your Flamingo knitting. Enjoy.

August 9, 2010

Hi-Bounce Inspiration

Hi Spud & Chloë Friends,

The second sleeve is almost done! I should have the starting information for the top down raglan knitalong together by the end of the week. That means yarn amounts and other basic information you’ll need to work along. Plus you’ll want to swatch before starting to make sure you are getting the gauge for the project.

I also have some new toy ideas I’m working on. The materials above are for two new toys. My daughter and I were out at an adorable local toy shop last week and we saw the Hi-Bounce Pinky balls. She quickly informed me that these balls are the favorites of all the kids in her gym class. Apparently Pinkies are the best bouncy balls around. I bought a couple to have on hand to include in some new toys.

Now I can’t stop thinking about the Hi-Bounce Pinky balls. I know just the toys to make around these! You never know what will inspire you.

The colors may be a hint for the animals I am going to work up… or maybe not. Stay tuned. I am going to cheat a little and use some Blue Sky Worsted Cotton in Ink (black) for one of the toys. This character definitely needs a tiny touch of black.

So that’s Spud & Chloë Sweater in Watermelon and Popsicle and Ice Cream and then the Ink in the Blue Sky Worsted Cotton if you’re interested. You won’t need much of any of it. I am hoping to squeeze two toys out of one skein of each with Watermelon as the main color in both toys. The Hi-Bounce Pinky balls can be found right here!

Oh, and you have to check out this gorgeous hooded cardigan knitted up by Peggity on Ravelry. The charted designs are from from a vintage pattern and the yarn is Spud & Chloë Sweater. I love the result (plus I always love old stuff). Here is what Peggity writes on her project page:

This yarn is wonderful – so soft and squishy!! Charted designs are from 1977 Dover Needlework Series book “Charted Peasant Designs from Saxon Transylvania” which is an unabridged republication of “Folk Cross-Stitch Design” originally published in Germany in 1964.

Click here to see the sweater! Anyway, I thought you might enjoy seeing Peggity’s work! What a treat.

I’ll be back soon with more!